
- Plan
- Explore
- Concept
- Evaluate
- Launch
Rapid Prototyping
Overview
How do you get real customer feedback before investing the weeks or months it takes to build the finished thing?
Quickly creating rough-and-ready mock-ups in order to get customer feedback, rather than building a finished site before testing anything. It’s the “prototype” step of Iterative Design: prototypes can be made in hours or days versus the weeks or months a real site takes, trading completeness for speed of feedback. Many features are faked outright (e.g. mocking up Personalized Content identically for every test participant) since the goal is to give customers a believable flavor of the final experience, not a working system. These artifacts become the actual deliverables produced during Web Site Development Process‘s Exploration and Refinement phases.
Quickly creating rough-and-ready mock-ups in order to get customer feedback, rather than building a finished site before testing anything.
Design artifacts
Three kinds of artifacts are typically produced early in design:
- Site map — a high-level diagram of a site’s overall information structure, and to a limited extent its navigation/flow. This is an internal planning artifact, never seen by customers — distinct from the live, on-site navigation page of the same name that ships as part of the finished site.
- Storyboard — a sequence of pages showing how a customer accomplishes a specific task; often paired with a narrative scenario when presenting to a client.
- Schematic — a layout/content representation of an individual page, usually without real images or final typographic decisions, meant to indicate what should be highlighted or grouped rather than a finished look.
Designers often sketch all three on paper first (sometimes via Affinity Diagramming — building a site map on a wall with index cards, Post-its, and pens so a whole team can brainstorm simultaneously) before cleaning them up electronically, or deliberately keep them rough to keep client discussion focused on structure rather than visual polish.
Choose a fidelity level
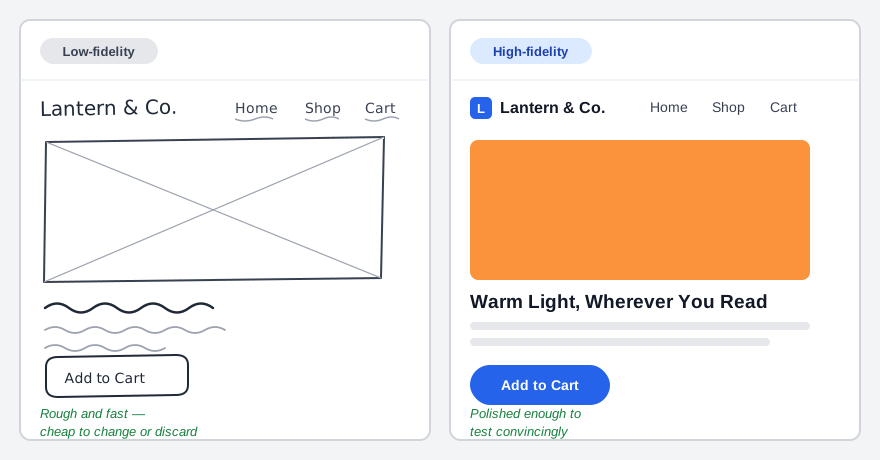 Roughness isn’t necessarily a downside — research on paper prototyping found it keeps designers exploring several directions, where a computer tool tends to lock onto and polish just one.
- Low-fidelity (“low-fi”) prototyping — paper, whiteboards, Post-its, scissors-and-glue cut/paste; far from the final design in both visual and interactive detail (e.g. hand-drawn icons, squiggly lines standing in for body text). Testable with representative customers by having a teammate “play computer,” flipping pages in response to where the customer points. At least 10–20x faster to produce than an equivalent high-fidelity version. Research cited in the source found designers using paper iterate more and explore the design space more broadly, while those using computer tools tend to lock onto one idea and polish it. Low-fi prototypes also lower the bar to contribution — anyone on a team, including non-designers, can make one — and they shift client feedback toward structure and labeling (“this link is missing”) rather than surface polish (“I don’t like this color”). A “paper prototyping kit” — paper, index cards, Post-its, transparencies, tape, scissors, an X-ACTO knife, paste, markers, pens, rulers — is recommended as a standing team resource. A sketch-based computer tool for this stage, DENIM, was built by the authors as a research prototype.
- Medium-fidelity prototyping — a cleaned-up illustration with much more content detail than a low-fi sketch but no typography, color, or graphics; a compromise for presenting to clients who consider raw sketches unprofessional but for whom a full high-fi mockup would prematurely focus discussion on visual details.
- High-fidelity (“hi-fi”) prototyping — polished, computer-built mockups (e.g. in Dreamweaver, Photoshop, Illustrator) that look and feel close to the finished site. Appropriate once major structural and interaction issues are settled and tested; general-purpose Web design/graphics tools of this kind are built for finished products, not early iteration, which is part of why low-fi is recommended first.
At least 10–20x faster to produce than an equivalent high-fidelity version.
Choose horizontal or vertical scope
- Horizontal prototype — broad but shallow: shows top-level pages and the links between them without building out what’s behind each link. Good for checking that the site’s basic features exist and are organized sensibly.
- Vertical prototype — narrow but deep: implements only the specific sequence of pages needed to complete one task in full (e.g. sign-in/new account), with no links out to the rest of the site. Appropriate for a complex, poorly-understood feature that needs focused exploration.
The two are often combined: a horizontal prototype across the whole top level, with one section fleshed out vertically.
Manage the limits of prototyping
Prototyping is sometimes seen as time taken away from building the real site, so its value needs to be actively explained to stakeholders. It’s also weaker for certain kinds of information — e.g. estimating real download speeds or customer-service quality — and medium/high-fidelity prototypes risk making clients believe the site is nearly finished, so expectations need active management.
Prototyping is sometimes seen as time taken away from building the real site, so its value needs to be actively explained to stakeholders.
Related Concepts
Patterns
Processes
- Iterative Design
- Usability Evaluation Methods
- Web Site Development Process
- Storyboarding
- Affinity Diagramming
- Journey Mapping
- Service Design
Sources
The Design of Sites: Ch. 4 — Involving Customers with Iterative Design is this page’s sole source — the site-map/storyboard/schematic design-artifact taxonomy, the low-/medium-/high-fidelity spectrum (including the finding that paper prototyping encourages broader design exploration than computer tools), and the horizontal-versus-vertical scoping distinction all come directly from that chapter’s rapid-prototyping section.